

Hi everyone!
OK, so it’s my pleasure to announce that we’re ready. We’ve been working on DNS Override for couple of months now, and the whole team has been anxiously waiting for this day.
Let me begin with a short intro on how did we end up creating DNS Override app in the first place. It all started on the page explaining how to configure OpenDNS on iOS. Along with the details on how to configure DNS servers for Wi-Fi, the page stated:
These instructions only work for Wi-Fi connections because iOS does not allow you to change the DNS servers when connected to cellular networks. Also, the changes are network specific, so you’ll need to change the DNS servers every time you connect to a new wireless network.
This seemed inconvenient – to say at least, but unfortunately true. There is no single setting for globally preferred DNS servers on iOS. It’s all configured on per-network basis and there are no settings for cellular networks. That’s really bad news for someone, who uses DNS servers not just for basic domain name resolution, but for things a bit more advanced like monitoring and filtering network activity. On the other hand, even just for the very basic “translation of domain names into IP addresses” (which is probably the shortest definition of DNS I can think of) there’s a lot of alternatives that can really improve your Internet experience. Maybe there’s something better than OpenDNS?
So, to sum things up: you can’t change DNS for cellular, you have to configure every Wi-Fi you connect to separately and to do so, you should probably learn”208.67.222.222″ and “208.67.220.220” by heart (these are the OpenDNS servers’ IP addresses you have to type in the configuration screen). Also, if you’re looking for DNS alternatives, you need to google them. All this looked like an opportunity. We did some research and found out that … “hey! there’s no app for that!”. So we decided to do something about it.
That’s when we started searching for any technical possibility of solving these problems on iOS. Today we believe we’ve found it. And in fact, while we were doing it, we solved one more problem that affected a lot of advanced DNS users, which is keeping your DNS provider up to date with your public IP address (some of the DNS features will work properly only if the DNS servers know your current public IP address).
Today we’ve published DNS Override. The app free to download from the App Store.
Let me take you through some of the features the first release has.
List of popular public DNS and SmartDNS providers
When you launch the app you’ll see a list of built in DNS profiles. They are split into two groups: public DNS and SmartDNS profiles. We’ve gathered this list by going through different reviews, recommendations and rankings available online. We’ll keep the list up to date and add new providers over time (we’re also open to suggestions). The current list of built in profiles is as follows:
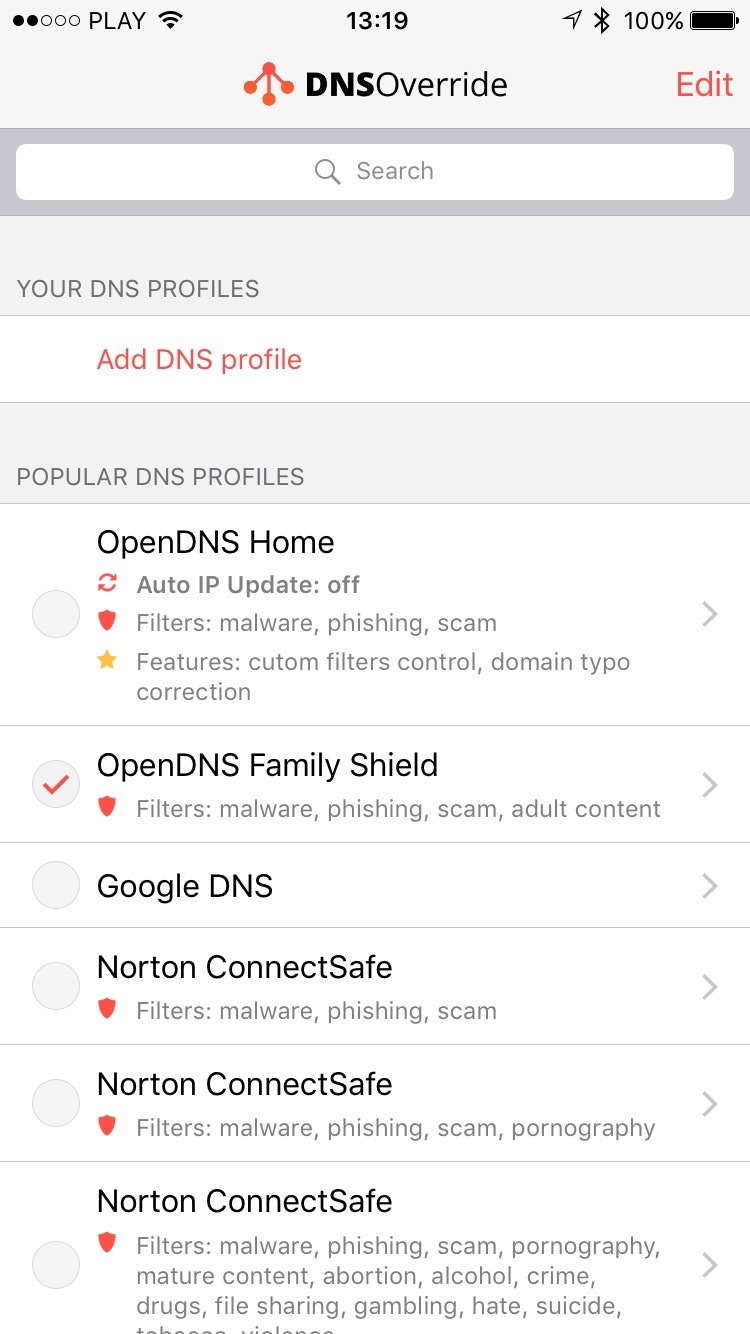
Public DNS profiles:
- OpenDNS Home
- OpenDNS Family Shield
- Google DNS
- Norton ConnectSafe (3 levels of protection)
- Comodo SecureDNS
- DNS Advantage
- Level 3 Public DNS
- Dyn Internet Guide
- OpenNIC
- SafeDNS
- DNS Watch
SmartDNS profiles:
- HideIPVPN
- SmartDNSProxy
- Unblock-Us
- Blockless
- UnoTelly
- Unlocator
- CactusVPN
- Invisible browsing VPN
- SmartyDNS
- OverPlay
- Getflix
Every profile has a short list of available DNS-based features you can benefit from.
Additionally, you can create your own DNS profiles if you have your own DNS servers or would like to use some provider that isn’t listed in the app. You can use the “Add DNS profile” button to create a new DNS profile.
Built in instructions on how to manually configure DNS servers while on Wi-Fi
After going into the details view for any of the predefined profiles, the app displays more detailed information, which include:
- The list of DNS servers’ IP addresses – taping on any address will copy it into the clipboard
- List of features offered by the provider. Some of these features may include: custom or category based content filtering, domain typo-error correction, unblocking geo-restricted content (SmartDNS providers) or custom TLDs
- Brief service description, highlighting all of the benefits coming with the use of this provider
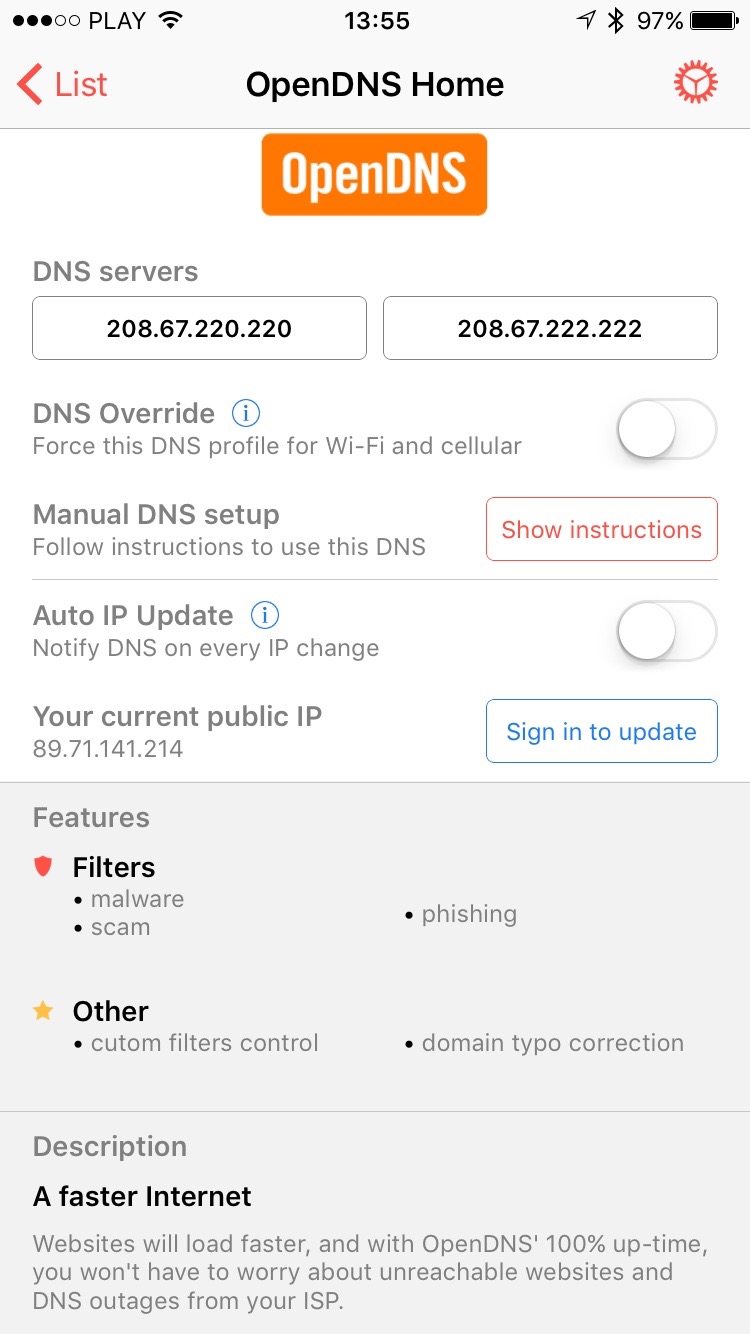
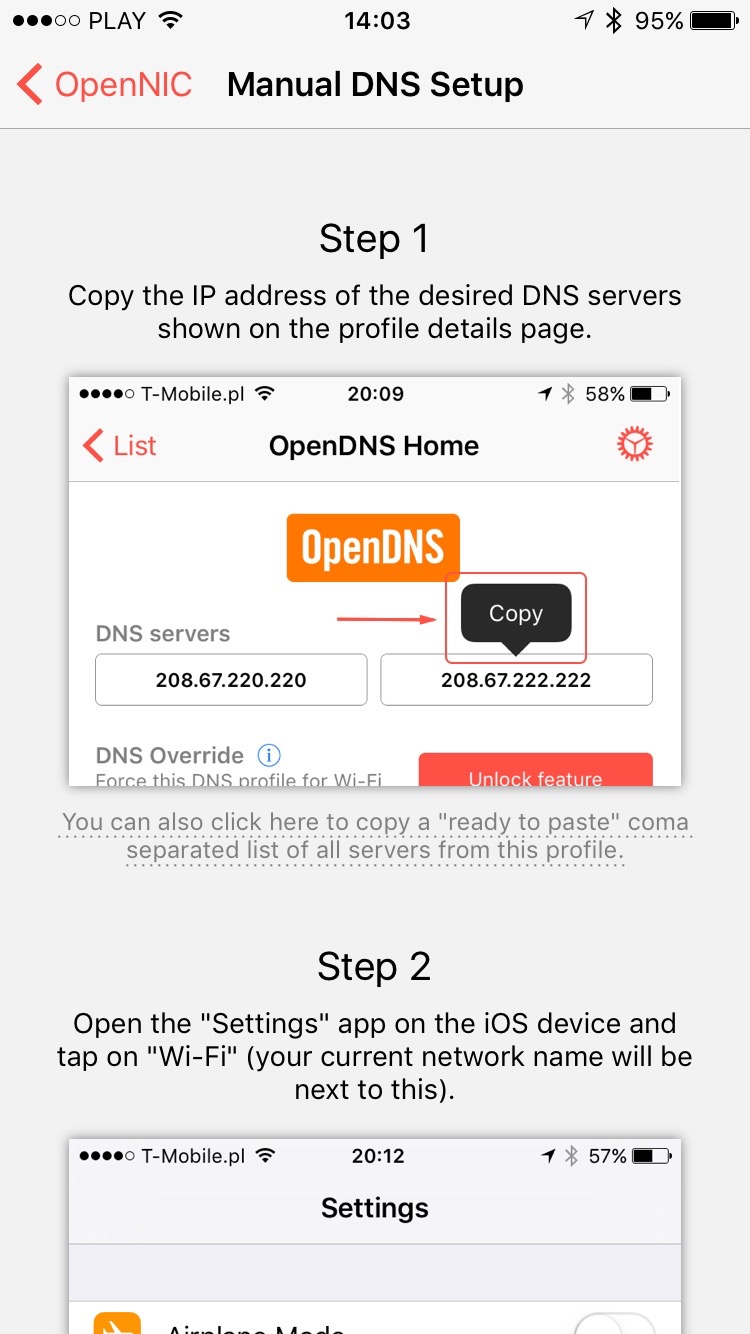
In the details view you can also tap on “Show instructions” button in the Manual DNS Setup section. This will open an instruction explaining how to configure DNS settings for the current Wi-Fi network. This is more or less a mobile version of the same instruction all DNS providers publish on their websites (some examples: 1, 2, 3, 4, 5, 6, …). To smooth the configuration process we’ve additionally introduced an option to copy a ready-to-paste string of DNS servers formatted as a coma separated list.
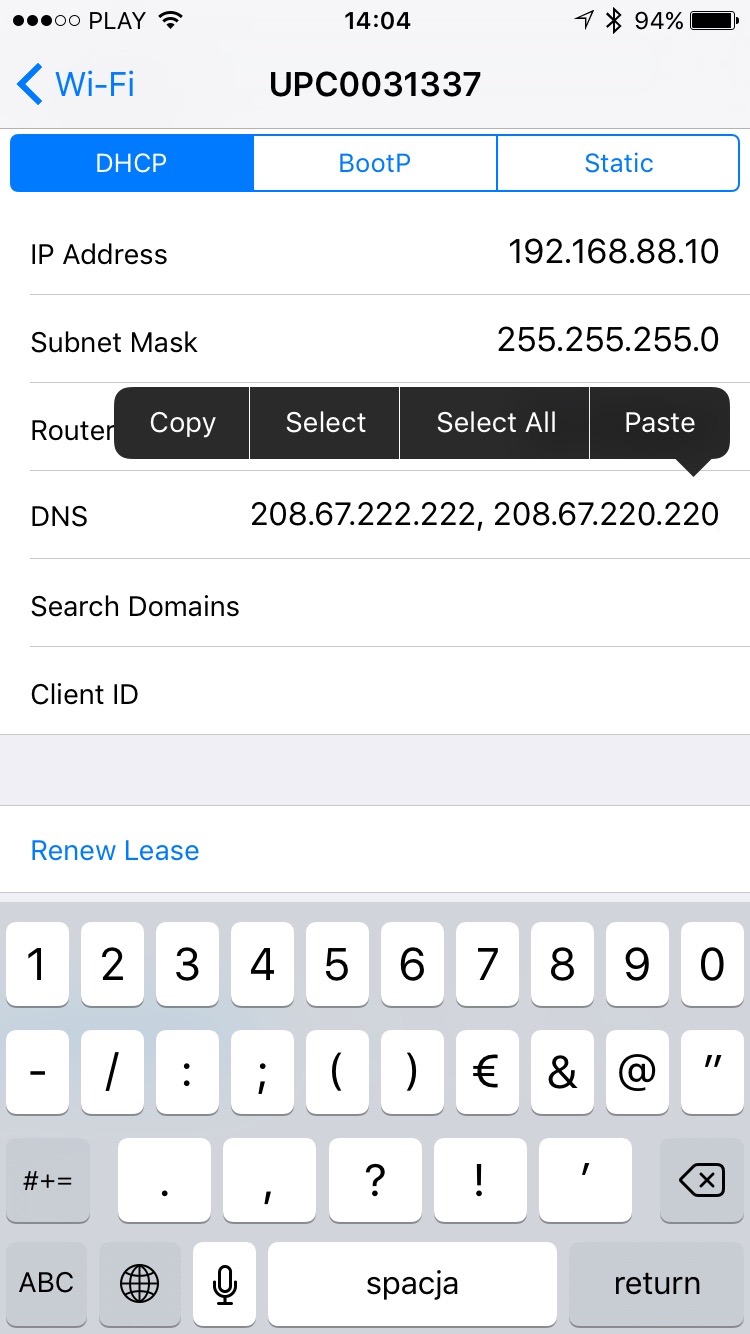
This is the format in which you have to input the DNS server list in Wi-Fi settings, so it’s easier than going back and forth copying DNS servers separately.
Configuring your Wi-Fi connection using this method is a standard iOS DNS configuration procedure and will not work on any other Wi-Fi or cellular connection.
DNS Override feature (available as an one-time in-app purchase for $1.99)
DNS Override feature allows you to select one of the profiles from the list and use it to override the default DNS configuration of any network you connect to (Wi-Fi and cellular). To enable it you can either select one of the profiles directly in the list (by toggling a checkmark next to the listing) or by going into the details view and switching “DNS Override” on. Obviously you can only have one profile active at a time (selecting any profile will disable the previously active one).
The DNS Override feature requires an one-time in-app purchase to activate. After activation you’ll be able to select any of the profiles listed in the app, including your own ones.
Auto IP Update feature (available as an one-time in-app purchase for $1.99)
While working on the basic DNS override features we realized that some of the DNS providers require you to create an account in order to give you access to some of the features. This applies to basically all SmartDNS and some public DNS providers. The common method DNS servers use to know that a requests comes from a specific user is the source IP address of that request. For this reason you have to keep the DNS provider up to date with your current public IP, which, in many cases, isn’t easy (especially on mobile). Since we all use our phones on the move, we often change Wi-Fi networks and switch to 3G or LTE in between. It’s fairly save to assume that every time we change networks, our public IP changes with them. For this reason some of the public DNS and SmartDNS services (or the community behind them) created their own dedicated apps, which allow you to easily update your current public IP. A good example of such an app is Unlocator Updater, also available for the Apple Watch. The major downside here is the fact that you have to remember to update your IP every time you switch networks. You have run the app or at least press a widget button when it happens, so the request with your new public IP is properly sent out to your DNS provider.
This is something we’ve also looked into and found a way to make your device automatically notify your DNS provider on every network change. So not only DNS Override allows you to manually trigger this update (and it’s free), but with the Auto IP Update feature unlocked, you can enable automatic updates, which will happen entirely in the background (the app doesn’t have to be even running). All you have to do is configure your authorization credentials or authorization token in the profile configuration and switch on the Auto IP Update feature. You can then forget about keeping your DNS up to date with your public IP since your iOS device will do it by itself.
Thanks to DNS Override’s Auto IP Update feature you can configure your device to take full advantage of great public DNS and SmartDNS functions. DNS Override can give you a continuous DNS experience on any iOS 9 or newer device, even when you’re on the move and changing networks. All of this is possible without jailbreaking.